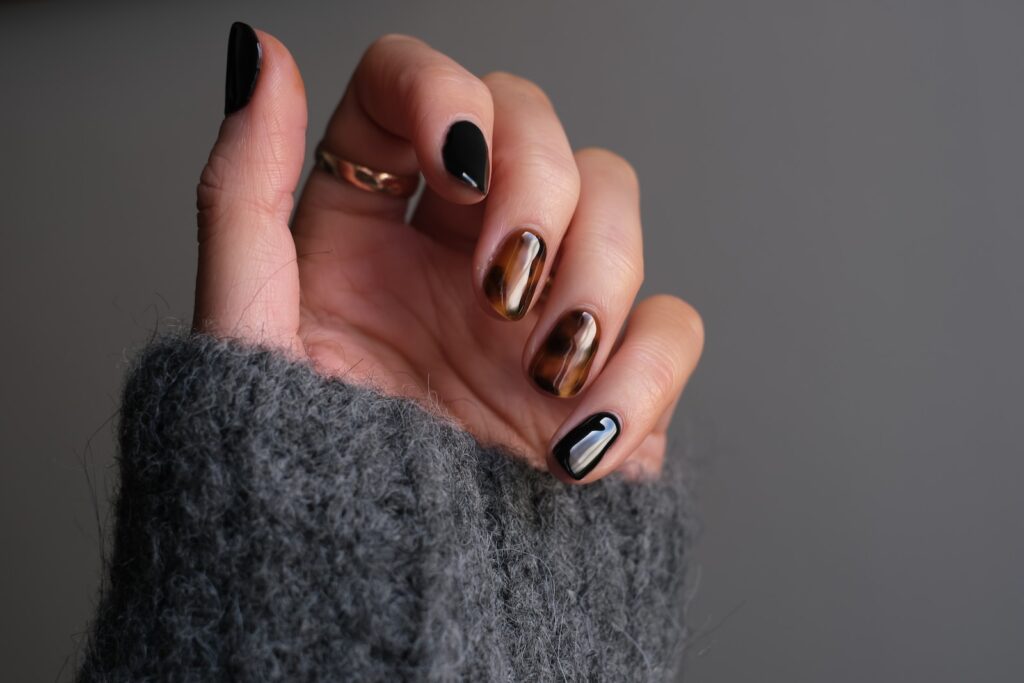
With their captivating blend of earthy tones and striking patterns, these nails are sure to make a statement. In this article, we’ll show you the secrets to achieving flawless tortoise shell nails, from choosing the perfect color palette to mastering the art of layering. Get ready to unleash your creativity and embrace the freedom to express yourself through your nails.
Key Takeaways
- Tortoise shell nails capture the essence of freedom and nature’s beauty
- The perfect color palette for tortoise shell nails should consider skin tone and include a mix of light and dark shades with different finishes
- Layering different shades of brown and gold is key to achieving a stunning tortoise shell design
- A glossy finish can be achieved by starting with clean and dry nails, applying a base coat, thin coats of nail polish, and finishing off with a clear top coat
The Inspiration Behind Tortoise Shell Nails
Have you ever wondered what inspired the trend of tortoise shell nails? Well, let me tell you, my freedom-seeking friend.
The inspiration behind this fabulous nail trend can be traced back to the mesmerizing beauty of nature itself. Picture yourself surrounded by tall, ancient trees in a lush forest. The sunlight filters through the leaves, casting a warm golden glow on everything around you. As you walk, you come across a magnificent tortoise, its shell adorned with intricate patterns of rich browns, deep blacks, and hints of amber. The sheer elegance and freedom embodied by this majestic creature sparked a wave of creativity in the nail art community.
Tortoise shell nails capture the essence of freedom and nature’s beauty, allowing you to express yourself with every brushstroke. The swirling patterns mimic the organic flow of the tortoise shell, creating a unique and eye-catching design on each nail. With the freedom to choose your own color palette, you can embrace earthy tones or add a pop of vibrant color to stand out from the crowd.
Choosing the Perfect Color Palette
You can create a stunning tortoise shell nail design by carefully selecting the perfect color palette to complement your personal style. Here are four tips to help you choose the ideal colors:
- Consider your skin tone: Look for shades that will enhance your natural complexion. If you have warm undertones, opt for rich browns and burnt oranges. For cooler undertones, go for earthy greens and deep blues.
- Play with contrast: To achieve a striking tortoise shell effect, mix light and dark colors. Pair lighter shades with darker ones to create depth and dimension on your nails.
- Embrace texture: Tortoise shell patterns often feature a mix of matte and glossy finishes. Experiment with different nail polishes to add an interesting tactile element to your design.
- Express your personality: Don’t be afraid to get creative and incorporate your favorite colors into the design. Whether you prefer bold and vibrant hues or subtle and muted tones, let your nails reflect your unique style.
By following these tips, you can create beautiful tortoise shell nails that not only look amazing but also showcase your individuality and freedom of expression.
Mastering the Art of Layering
When it comes to mastering the art of layering, there are a few key points to keep in mind.
You’ll want to experiment with different color combinations to create unique and eye-catching looks. Nail polish application techniques play a crucial role in achieving a flawless layered effect.
Color Combinations for Layering
Try experimenting with different shades of brown and gold for a stunning color combination when layering your tortoise shell nails. Start with a base coat of a light brown shade to create a warm and natural look. Then, apply a layer of a darker brown shade, adding depth and dimension to your nails. Add a touch of gold by using a metallic gold polish to create a luxurious and eye-catching effect.
Finally, finish off with a top coat to seal in the colors and add shine. This color combination will give your tortoise shell nails a unique and sophisticated look, perfect for any occasion.

Nail Polish Application Techniques
Get ready to elevate your nail game by mastering the art of layering with different nail polish application techniques. Whether you’re a nail enthusiast or just looking to switch up your look, experimenting with various techniques can bring endless possibilities to your nails. Check out the table below for three different application techniques that can take your nail game to the next level:
| Technique | Description | Results |
|---|---|---|
| Sponge | Dabbing multiple colors onto a sponge and pressing it onto your nails for a gradient effect | A seamless blend of colors with a soft, gradient finish. |
| Dry brush | Wiping off most of the polish from the brush and lightly brushing it over your nails for a distressed look | A trendy, distressed effect with visible brush strokes. |
| Dotting | Using a dotting tool or toothpick to create dots of different colors on your nails | A fun and playful design with colorful dots. |
Experimenting with these techniques will give you the freedom to create unique and eye-catching nail designs. So go ahead and let your creativity run wild!
Achieving a Glossy Finish
You can achieve a glossy finish by applying a clear top coat to seal in the layers of nail polish. Here are four steps to help you achieve that perfect shine:
- Start with a clean and dry nail surface. Remove any old polish and gently buff your nails to create a smooth canvas.
- Apply a base coat to protect your nails from staining and to help the polish adhere better. Allow it to dry completely before moving on to the next step.
- Apply two thin coats of your chosen nail polish color, allowing each coat to dry fully. This will ensure an even and opaque finish.
- Finish off with a clear top coat. This won’t only give your nails a glossy shine but also help extend the wear of your manicure.
With these simple steps, you can achieve a glossy finish that will make your nails look stunning and polished.
Enjoy the freedom of expressing yourself through beautiful, glossy nails!
Tools and Techniques for Creating Tortoise Shell Nails
To achieve a stunning tortoise shell design, start by using a small dotting tool for creating intricate patterns.
Begin by applying a base coat to your nails and let it dry completely.
Then, choose two or three complementary nail polish colors that resemble the beautiful hues of a tortoise shell.
Using the small dotting tool, start by creating small dots of the darkest color on your nails. These dots will serve as the base for the tortoise shell design.
Next, take a lighter shade and create smaller dots around the darker ones, blending them together to create a gradual transition.
Repeat this step with a third color, if desired, to add depth and dimension to the design.
Once the dots are dry, use a thin brush or toothpick to gently swirl the colors together, mimicking the natural patterns of a tortoise shell.
Finish off with a glossy top coat to seal in the design and add a touch of shine.
With these simple tools and techniques, you can achieve a stunning tortoise shell nail design that’s both stylish and unique.
Tips for Achieving a Flawless Finish
To achieve a flawless finish on your tortoise shell nails, start by properly prepping your nails. This includes cleaning, shaping, and buffing them to create a smooth canvas.
When it comes to the design techniques, be sure to use thin layers of polish and take your time with each step to avoid any mistakes.
Nail Prep Essentials
Grab a few essential nail prep items, like a nail file, cuticle pusher, and nail brush, to ensure a flawless finish for your tortoise shell nails. Here’s what you need to achieve that perfect look:
- Nail file: Use a gentle file to shape your nails according to your desired style. Smooth out any rough edges for a polished finish.
- Cuticle pusher: Gently push back your cuticles to create a clean canvas for your nail polish. This will help your nails look neat and well-maintained.
- Nail brush: Scrub your nails with a nail brush to remove any dirt or residue. This will ensure that your nail polish adheres smoothly and lasts longer.
- Nail polish remover: Before starting your tortoise shell design, make sure to remove any old polish from your nails. This will prevent any color clashes and allow the tortoise shell pattern to shine.
With these nail prep essentials, you’ll be ready to create stunning tortoise shell nails that show off your individuality and freedom.
Design Techniques
You can enhance the overall look of your tortoise shell nails by incorporating different design techniques, such as layering and marbling, to achieve a flawless finish.
By layering different shades of brown and black nail polish, you can create a realistic tortoise shell effect. Start with a base coat and then apply thin layers of polish, allowing each layer to dry before adding the next.
You can also experiment with marbling techniques, using a toothpick or a thin brush to swirl different colors together on your nails. This will give your tortoise shell nails a unique and artistic touch.
Remember to seal your design with a top coat to ensure longevity. Feel free to explore different patterns and colors to express your personal style and creativity.
With these design techniques, your tortoise shell nails will be the envy of all.
Trendy Variations: Adding a Modern Twist to Tortoise Shell Nails
Have you considered experimenting with different color combinations for a modern twist on tortoise shell nails? It’s time to break free from the traditional browns and blacks and embrace a world of vibrant possibilities.
Here are four trendy variations to inspire your next nail art adventure:
- Electric Elegance: Combine deep, rich shades of emerald green, sapphire blue, and amethyst purple for a bold and captivating look. The mix of jewel tones will add a touch of sophistication to your nails, perfect for a night out or a special occasion.
- Pastel Paradise: Soft pastel hues are all the rage this season. Experiment with delicate shades of mint green, baby pink, and lavender to create a dreamy and feminine tortoise shell design. This ethereal look is ideal for a springtime picnic or a casual brunch with friends.
- Metallic Marvel: Amp up the glam factor by incorporating metallic accents into your tortoise shell nails. Pairing shimmering gold, silver, and bronze with the classic tortoise shell pattern will give your nails a modern and edgy twist. Get ready to shine wherever you go!
- Neon Fusion: For those who crave an electrifying look, embrace the neon trend. Mix vibrant shades of neon yellow, orange, and pink to create a statement-making tortoise shell design. This eye-catching style is perfect for music festivals, parties, or any occasion where you want to stand out from the crowd.
Maintenance and Removal: Keeping Your Tortoise Shell Nails Looking Fabulous
To maintain the fabulous look of your tortoise shell nails, try using a gentle nail polish remover with acetone to carefully remove any chipped or faded polish. Acetone-based removers are effective in getting rid of old polish without damaging your nails. Here is a quick guide to help you keep your tortoise shell nails looking flawless:
| Step | Instructions | Frequency |
|---|---|---|
| 1 | Apply a small amount of acetone-based nail polish remover to a cotton pad. | As needed |
| 2 | Gently press the cotton pad onto your nail, covering the entire surface. | As needed |
| 3 | Hold the cotton pad on each nail for a few seconds to allow the polish to dissolve. | As needed |
| 4 | Swipe the cotton pad in one direction to remove the old polish. Avoid rubbing back and forth, as it can damage your nails. | As needed |
| 5 | Repeat steps 1-4 on each nail until all polish is removed. | As needed |
Remember to moisturize your nails and cuticles after removing the polish to keep them healthy and hydrated. Additionally, it is important to take breaks from wearing nail polish to allow your nails to breathe and prevent weakening. By following these simple steps, you can maintain the stunning look of your tortoise shell nails and enjoy the freedom of expressing your personal style.
Conclusion
So there you have it, a quick guide to achieving fabulous tortoise shell nails.
With the right color palette, layering techniques, and tools, you can create a trendy and modern twist on this classic nail design.
Don’t forget to take care of your nails and remove the polish properly to keep them looking flawless.
Now go forth and rock those tortoise shell nails with confidence!